« Contents of A Template | Main | Changing The Templates »
Sunday, October 04, 2009Changing The StylesheetThe style sheet, the templates, and the Thingamablog custom tags work in conjunction with one another to create the whole look of the blog. It is all too much to grab onto at once, so I will start with what I have done to the style sheet for my new template. My main issue with the existing templates, other than the type fonts and colors that I don't like, is the way the blog responds to resizing the browser window. When I first tried out Thingamablog the text in the body and the text in the sidebar were actually overlayed in some browsers. Different browsers interpret the text sizes in different ways, and some of them made a mess out of it right from the start, i.e., without even resizing the browser to a smaller size. So I set out to fix those issues. The built-in style sheet specifies the type fonts and colors, but it also specifies some positioning information. I took the positioning information out, preferring to do that in the html of the templates using tables. I will talk about the html templates later. Here I describe what I did to the style sheet. I removed all absolute positioning directives and most of the margins, letting the tables in the html do that work for me. For example, the following code for the links ID, #links {
position: absolute;
right: 10px;
width: 280px;
text-align: right;
}
was changed into this: #links {
text-align: left;
}
The absolute positioning was playing havoc with the work being done by my tables. The absolute positioning directives in the style sheet were upstaging the tables and hence going on the right hand side of the screen. I changed the text alignment from "right" to "left" because I will be placing the links on the left side of the screen in the tables. The directive, however, now aligns the text within the cell of the table instead of on the screen because I removed the "position: absolute;" from the id. Similarly, I went from this:
#content, #container {
    background-image: url(nhat-bodybg.jpg);
    background-repeat: repeat-x;
    background-position: bottom left;
    position: absolute;
    left: 0;
}
to this:
#content, #container {
    background-image: url(nhat-bodybg.jpg);
    background-repeat: repeat-x;
    background-position: bottom left;
}
for the content part of the blog. The tables in the html now have the authority to align the contents. You may notice that I have changed the background-image to my new image, nhat-bodybg.jpg, seen in a previous post on this blog. I also changed the type font and the colors in the banner and titles. Here is what I ended up with: #banner {
background-image: url(nhat-titlebg.jpg);
border: #565 1px solid;
color: #595979; /* gray blue */
font-family: "Times New Roman",Georgia,Serif;
font-weight: bold;
font-size: x-large;
margin: 5px;
padding: 5px 20px;
}
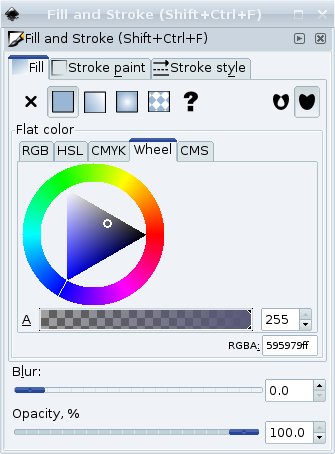
Notice that I have specified a set of preferred type fonts to make it more likely that one will be found on the browser. Call me boring, but I really like Times New Roman. The colors are specified in hexadecimal code. The "color:" property specifies the color of the text, not the color of the background. I have set the color to #595979, which is a steel blue gray color. So, how did I come up with that number? I used a color chooser wheel in a graphics editor called "Inkscape". Inkscape is a vector drawing tool which is free. It runs on both Windows and Linux, so you should be able to use it regardless of your operating system (I don't know about Apples since I do not have access to one to try it out). However, that said, just about any image editing tool now has a similar color chooser. You can choose the color you want visually and then copy the hex code out of a text box in the dialog and paste the number into the style sheet. Here is an example of the Inkscape color chooser:
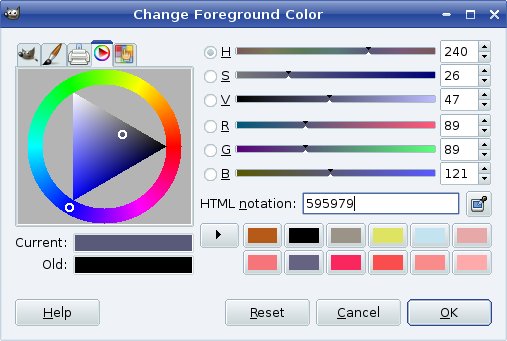
You spin the wheel around by dragging the while line in the circle until you get the color you want (red, green, blue...) and then click inside of the triangle to get the saturation and value that you want. Notice that the number 595979 is shown in the box labeled "RGBA". The "ff" in the box is the "alpha" channel, which specifies the transparency of the color. The style sheet does not understand that number, so we don't use it. Copy and paste only the other six numbers, 595979. A similar tool exists in the pixel editing tool called "The GIMP". The GIMP is another editor that runs on both Windows and Linux and is free. Here is a screen shot of the color chooser in The GIMP:
You can see that it is almost identical to the one in Inkscape. All you need to do is pick the color and then copy the number from the box labeled "HTML notation" and paste it into the style sheet. I made most of the colors in my style sheet black (#0) except I used the gray blue color in the following id's and classes:
I did a similar thing for the links on the page, making them light blue, "color: #1d51f8;" before being visited, and darker blue, "color: #170d6b;" after being visited. I am not completely happy with that choice, and I may revisit those colors in the future. You can also find a menu of web safe color choices on the css tutorial from the w3schools.com web site, here:
Posted by Brian S. Kimerer at 9:40 AM
This site and all of its contents are copyright Brian S. Kimerer 2009 |
|
I am a software engineer by trade. For fun I build and play banjos and paint pictures. To see some of my work, click on the link that says "My Web Site" in the Links section of this page. Favorite Links
Google Site Search
Credits
|