It is the middle of December and everything is frozen. so this is a good time to plan the next banjo. From my experiences last time I have some definite ideas about what to do with this next one. I also have a rather unique gourd to work with since it is huge. I will get to the gourd later, now I want to talk about some ideas for improvements over my previous efforts. Here are some of the issues:
First things first: the pegs. The pegs on both of my two previous banjos are a bit too close together. They work very well, but when they get into certain configurations there is no room between them for my fingers. I would like to make a longer peghead so that I can separate the pegs a bit. The other heads were designed to be 5" long. I think I will attempt to make the next one 6" long and see if that helps.
One of the constraints that I would like to keep is that I will take the entire neck out of 6' of wood. I have bought some wood in 12' lengths, and if I can keep the length of wood required down to 6' I can get two whole necks out of each 6' section of the boards. I also want to cut each entire neck out of a single board to make the figure and color more consistent through the neck. On my previous banjo I mixed boards in the neck blank not realizing that they had radically different amounts of figure and color. The result was unpleasant.
I also plan on cutting the pieces sequentially down the board, for example all of the peghead pieces will be taken from the same end of the board. That will help keep the neck uniform with regard to changes in the wood down the length of the board.
I want to add a frailing scoop as well. The gourd for this banjo is large, which should make the sound of it mellow. Playing the instrument over the neck will enhance the mellow sound and a frailing scoop will aid in that.
My previous banjo, which you can see here:
http://www.thekimerers.net/brian/gourd2/index.shtml
has a rather plain neck. I made it that way to enhance the small, simple gourd. It is nice on that banjo, but I really do like the double ogee that I put on the one before that, which you can see here:
http://www.thekimerers.net/brian/gourd/index.shtml
The double ogee provides some convenient visual milestones for tuning and grabbing notes up the finger board.
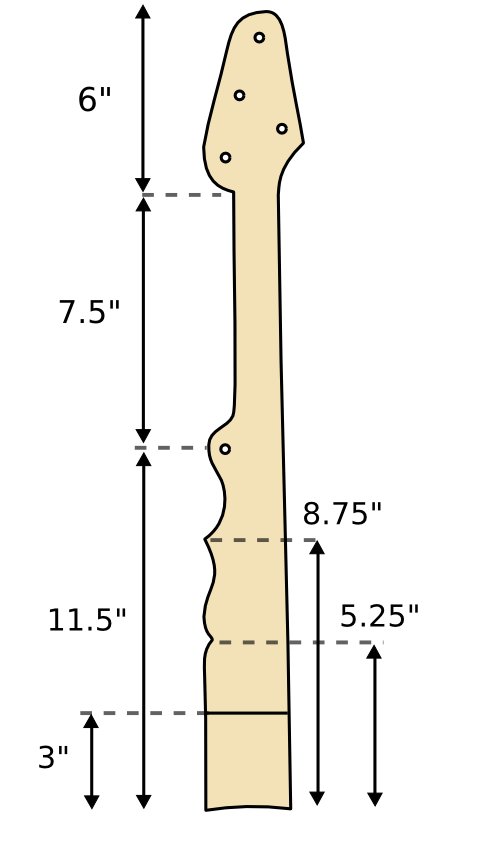
Enough of that. Here is an image of my design so far:
The line with the label 3" delineates the end of the fingerboard. At that point, 3 inches from the heel, I will cut a frailing scoop. This banjo is going to have a very large head so it will have a mellow sound; not twangy like a modern banjo. To allow me to make the best use of the mellow sound I would like to be able to play it over the neck. The frailing scoop, which is just that part of the fingerboard cut lower than the rest of the neck, will give me some clearance between the neck and the strings to make playing over the neck easier to do.
The other reason for adding the frailing scoop is that I like to get the entire peghead overlay plus the finger board out of one piece of wood. The wood I buy is 24" long, and with the longer 6" peghead plus the 19" neck it adds up to 25" of fingerboard wood to cover the entire neck. That is one inch too many for the length of my wood. So I will just cut 2" off of the 24 to give me a 3" frailing scoop. That takes care of the shortfall in the fingerboard wood.
My strange little peghead was designed with a purpose as well. To space the pegs out as far as possible I ran them up the left side of the peghead in a straight line. On my minstrel banjo, all 4 pegs are in line like that, but doing that makes the peghead too long. So I have taken the last peg (the peg for the 1st string) and moved it back down. Since it is on the other side of the peghead from the peg for the 4th string they should be far enough apart not to collide.
The dimensions for the location of the 5th string peg and the ogee bumps and notches were taken from my minstrel banjo. I really like that design so I see no need to change it.
Another issue that I face is getting the whole neck out of one 6' board. I have added an additional inch onto the length of the peghead, so I need to get that inch from somewhere. Here is the design that I came up with:
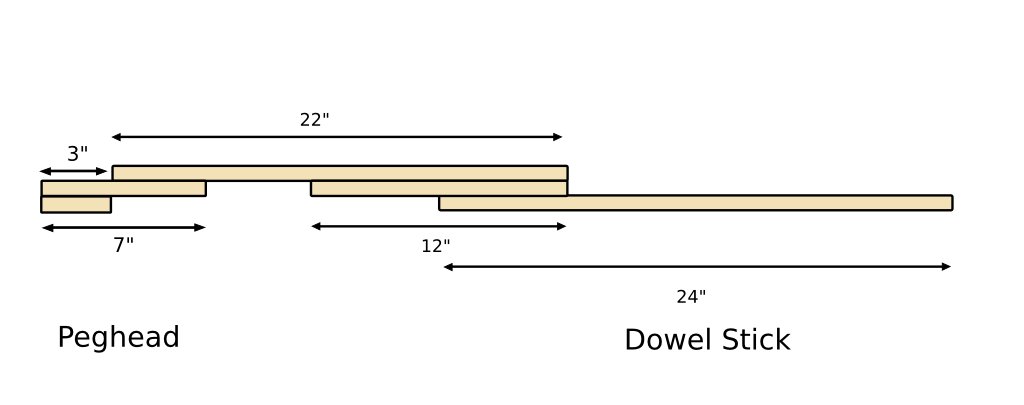
Compared to my previous neck blank, which you can see here I have optimized the use of wood at the peghead end of the blank. Last time I put 6" of wood on the bottom of the peghead, and I noticed that I had cut half of it entirely away when I cut the angle of the peghead. So this time I am using only 3" of wood at the bottom of the peghead.
I also removed three inches of wood from the long piece on the top (the piece which makes up most of the length of the neck), but then I had to add one inch back in for the longer peghead. So the top piece has gone from 24 inches to 22 inches.
To make this a bit more clear, I have drawn up a detailed sketch of how the peghead will be laid out on the end of the neck blank with this new configuration:
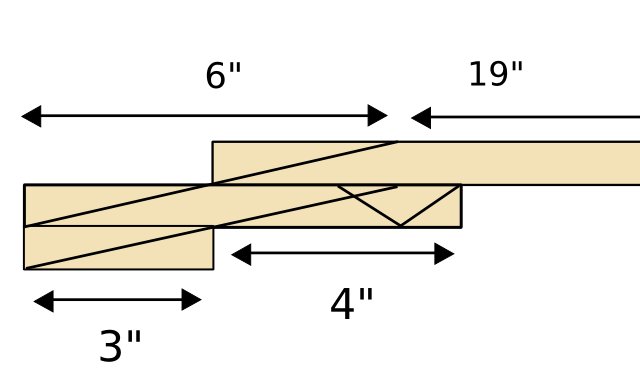
You can see that the middle piece of the peghead is now 7" long instead of 6". The extra inch (the peghead is only 6" long) is to make room for the handstop. The handstop is the triangular piece marked off on the right hand side. The base of the triangle is 2" with one inch being under the peghead and one inch being under the neck.
So I have used another inch for the handstop. I have saved 6" and given back 2" with a total savings of 4" of wood. Now let's see if we can get the rest of the parts out of the remaining wood.
I need a 12" piece for the heel and a 24" piece for the dowel stick. If I add up all the lengths I get:
| Bottom of peghead | 3" |
| Middle of peghead | 7" |
| Top of neck | 22" |
| Heel | 12" |
| Dowel stick | 24" |
| --------- | --------- |
| Total | 68" |
Since 6' of board = 72", that leaves me with 4" of board left for the extra tailpiece. That ought to work.
Well, that's the theory and the plan. As we all know, plans often go awry, but it gives me something to do while the snow flies.
Original post date December 13, 2008