« November 2009 | Main | September 2009 »
Friday, October 30, 2009Translucent Title PanelsI like the look of the translucent panels behind my titles in my other blog. Here is a link so you can see what I mean: It took a bit of doing to get that look. At first I tried the obvious and made the images translucent using .png files, but the browsers treat such images differently, and some browsers ( IE ) posted the images as opaque, which destroyed the look. So I worked to find a workaround that would display properly in all the browsers. What I came up with was two opaque .jpg files that I created from a single background tile. The first one is called "nhat-bodybg.jpg". It is used for the basic background of the blog. Here is the image:
I pulled that image into The GIMP, and I used the Brightness and Contrast tool to darken it just slightly. Then I saved it as the file "nhat-titlebg.jpg". Here is the image:
You can see that it is just ever so slightly darker than the other image. That image is used in my theme as the background for the titles. The title images overlay the background image, and since they are opaque, they totally cover the background. But since I align all of the images on location 0, they are overlaid perfectly on the screen, and the darker title bars appear to be translucent because the patterns line up with the underlying background image. This technique appears to work in all the browsers, and I like the look of it. BTW, I figured out how to display the images shown above without importing more copies of them. I simply typed the URL's of the images directly into the image wizard. I used Filezilla to find the images online and then entered the paths manually. Sunday, October 18, 2009Image Handling StrangenessI just encountered another strangeness with image handling in Thingamablog. Everything worked out OK, but one of my images has been duplicated and renamed. I imported an image named, "devil-2797.jpg" into the media folder. In the entry editor, I posted the image using the image wizard and then pointed to the image in the media folder in the database folder. The end result was the HTML entry pointing to an image named "devil-2798.jpg", which now also exists in the media folder on my disk. I don't know where the second image came from, if I imported it twice or if it was duplicated upon publishing. I did this in my other blog, "Nothing Happens At Ten". To puzzle this out, in this entry I have gone through the exercise again to see what happened. I have imported the following image into my media folder to see what happens when I publish:
The name of the file is "nhat-bodybg.jpg", and it resides directly in the database media folder. The URL that is in the current HTML after the import (but before I published the entry) is: <img align="middle" width="300" src="file:/home/brian/blogsdatabase/1247882990333/web/media/nhat-bodybg-1.jpg" alt="Body background" border="1" height="265"> It is pointing directly at a file on my hard disk, but the name of the file has been changed to append the "-1" on the end. I have apparently imported the image again, and Thingamablog has avoided overwriting the original file by assigning it a new name. I now have two copies of the file in the media folder with different names. The second one is used in the HTML. To continue this test, I have posted another image, named "nhat-titlebg.jpg" by referring directly to the image stored somewhere other than in my database directory. Here is the image:
After including the image in the entry, but before publishing the entry, here is the URL in the HTML editor: <img align="middle" width="300" src="file:/home/brian/blogsdatabase/1247882990333/web/media/nhat-titlebg.jpg" alt="Title Background" height="265"> This URL is also pointing to the media folder in the database folder. Digging down further into the guts of this thing I notice that the new image has already been copied into the media directory on the disk, but it does not appear in the "media" listing through Thingamablog yet. I suppose that the database which maintains the listing of imported files will be updated when the entry is published. We shall see. There is only one copy of the image in the media folder. There is an apparent implied import of the image into the media folder simply by including the image in an entry, regardless of where the original copy of the image resides on the disk. The image is copied into the folder, but not logged in the database yet. To continue reverse engineering the tool, I removed the image above. The copy of the image in the media folder was not deleted. It is still invisible to the Thingamabog GUI, but the file still physically exists on my disk in the media folder. I put the image back, and it made another copy in the media folder called "nhat-titlebg-1.jpg". <img align="middle" width="300" src="file:/home/brian/blogsdatabase/1247882990333/web/media/nhat-titlebg-1.jpg" alt="Title Background" border="1" height="265"> It would appear that each time an image is added to a blog entry Thingamablog copies the file into the media folder, and if the image name is already there, the name of the file is changed to avoid overwriting the previous image. So now I go ahead and publish the entry...... After publishing, all of the images have been uploaded to the server, even though only the last one imported is actually used in the blog. The URL of one of the images has been changed to: <img align="middle" width="300" src="http://www.thekimerers.com/brian/blogs/TAMB/media/nhat-titlebg-1.jpg" alt="Title Background" border="1" height="265"> This is good since it allows access to the image from all the pages out on the web. Unfortunately, I now have two images, "nhat-bodybg.jpg" and "nhat-titlebg.jpg", uploaded to the server that are not used in the blog. I can probably delete them safely without damaging the blog. I would not call this a bug in Thingamablog. I would call it an eccentricity caused by a convenience feature, which is automatically importing images used in an entry. The important thing to remember is that I can include images from anywhere on my disk without having to import them myself. That happens automatically. As long as I only enter an image once in an entry, no duplicates will be created. It works for me. Now I need to figure out how to refer again to an image that I know is already out on the server. Friday, October 16, 2009Mobile BloggingIt is an unfortunate fact that most of my good ideas for the blog come to me while I am away from the computer. So it would be good if I could write the blog while I am on the move. How to do this puzzled me for a while. I have read about carrying the blog database around on a jump drive and sending emails to post remotely. That all sounds too complicated to me. Carrying around my blog database on a thumb drive seems a bit risky because I am always losing things. Publishing with an email is difficult because I have no computer where I can leave Thingamablog running all day in the unlikely event that a stroke of genius will hit and I can email it to the program. Our computer is used by the whole family, and many people are logging on and off of the machine all day long. Finally, I had an "Aha" insight that cleared it all up for me. The Aha insight was that there is a difference between blogging remotely and publishing remotely. As long as I can enter the information on the road, it doesn't matter that I must wait until I get home to publish it. As it turns out, entering the text of a blog entry is as simple as using any text editor (I use Vim) to do the creative part, and then I can bring it home or send it home and paste the results into the blog editor to publish it. That is exactly what I did today. During lunch time at work I had an inspiration, so I typed it into a text file and emailed it to myself at home. Once I got home, it took me about 20 seconds to copy the text from the email and paste it into a new blog entry. I published it and there it was. It worked great. I really like the idea. It is simplicity itself. Sunday, October 11, 2009Create the Custom TabsToday I finished up the design of my new blog. I created the custom tags that I used to add my photo, bio, favorite links, etc. Rather than put them in this blog entry I have put them in a separate page. You can click here to see what went into my tags. On that page I show the name of the tags I created, what their contents are, and where in the templates I put them. Adding those tags to the templates took a while since I had to repeat the additions in all five templates. But once it is done I don't ever have to do that again. One thing I did do was to backup the templates with the changes in them to a different directory than the directory the database is in. I did that because if I ever have another brain cramp and change the theme of the new blog, it will trash all of my work. Better safe than sorry. I have now posted the new blog, called "Nothing Happens At Ten" so you can see the results. That blog is also accessible via my Favorite Links section on this page. Wednesday, October 07, 2009Changing The TemplatesToday I will describe what I did to the templates so that they will work in conjunction with what I changed in the style sheet. The basic idea is that I removed the positioning information from the style sheet and then put the contents of the blog in a table so that the table can arrange the content inside the boundaries of the browser. I like the way the table reformats the text better than what was coming out of the style sheet. I started with main.template. First, I copied all of the sidebar html above the content html. That can be recognized by the ID's "id=links" and "id="content". I did that to put the sidebar on the left side of the screen. Then, before the ID specification, <div id="links"> I added the following table specification. <table border="0" cellpadding="5" cellspacing="5" align="left" width=100%> <tbody align="left" valign="top"> <tr><td width="250"> and before <div id="content"> I added the end of the left hand table cell and the beginning of the right hand cell: </td> <td> Then after <br clear="all" /> I ended the table: </td></tr> </tbody> </table> The table is directed to use 100% of the browser window, and the left hand cell, which contains the links and calendar, is set to a fixed size, so the right hand cell, which contains the contents, is formatted to fill the rest of the browser window. This puts the sidebar on the left hand side of my blog. Moving the sidebar left to right would involve just swapping the locations of the two table cells, one containing the links html and the other containing the content html. The fixed width in the <td> tag, width="250", belongs to the cell with the sidebar. I did that to all 5 templates, and it looks pretty good. Next, I will create and use my custom tags to put my photo, links, and bio etc. into the blog. Sunday, October 04, 2009Changing The StylesheetThe style sheet, the templates, and the Thingamablog custom tags work in conjunction with one another to create the whole look of the blog. It is all too much to grab onto at once, so I will start with what I have done to the style sheet for my new template. My main issue with the existing templates, other than the type fonts and colors that I don't like, is the way the blog responds to resizing the browser window. When I first tried out Thingamablog the text in the body and the text in the sidebar were actually overlayed in some browsers. Different browsers interpret the text sizes in different ways, and some of them made a mess out of it right from the start, i.e., without even resizing the browser to a smaller size. So I set out to fix those issues. The built-in style sheet specifies the type fonts and colors, but it also specifies some positioning information. I took the positioning information out, preferring to do that in the html of the templates using tables. I will talk about the html templates later. Here I describe what I did to the style sheet. I removed all absolute positioning directives and most of the margins, letting the tables in the html do that work for me. For example, the following code for the links ID, #links {
position: absolute;
right: 10px;
width: 280px;
text-align: right;
}
was changed into this: #links {
text-align: left;
}
The absolute positioning was playing havoc with the work being done by my tables. The absolute positioning directives in the style sheet were upstaging the tables and hence going on the right hand side of the screen. I changed the text alignment from "right" to "left" because I will be placing the links on the left side of the screen in the tables. The directive, however, now aligns the text within the cell of the table instead of on the screen because I removed the "position: absolute;" from the id. Similarly, I went from this:
#content, #container {
    background-image: url(nhat-bodybg.jpg);
    background-repeat: repeat-x;
    background-position: bottom left;
    position: absolute;
    left: 0;
}
to this:
#content, #container {
    background-image: url(nhat-bodybg.jpg);
    background-repeat: repeat-x;
    background-position: bottom left;
}
for the content part of the blog. The tables in the html now have the authority to align the contents. You may notice that I have changed the background-image to my new image, nhat-bodybg.jpg, seen in a previous post on this blog. I also changed the type font and the colors in the banner and titles. Here is what I ended up with: #banner {
background-image: url(nhat-titlebg.jpg);
border: #565 1px solid;
color: #595979; /* gray blue */
font-family: "Times New Roman",Georgia,Serif;
font-weight: bold;
font-size: x-large;
margin: 5px;
padding: 5px 20px;
}
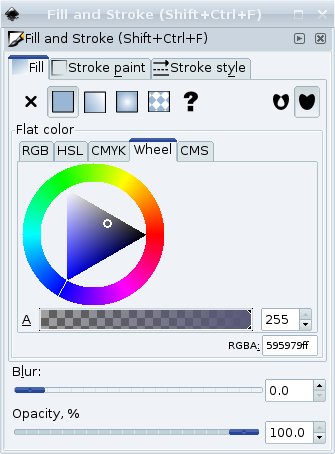
Notice that I have specified a set of preferred type fonts to make it more likely that one will be found on the browser. Call me boring, but I really like Times New Roman. The colors are specified in hexadecimal code. The "color:" property specifies the color of the text, not the color of the background. I have set the color to #595979, which is a steel blue gray color. So, how did I come up with that number? I used a color chooser wheel in a graphics editor called "Inkscape". Inkscape is a vector drawing tool which is free. It runs on both Windows and Linux, so you should be able to use it regardless of your operating system (I don't know about Apples since I do not have access to one to try it out). However, that said, just about any image editing tool now has a similar color chooser. You can choose the color you want visually and then copy the hex code out of a text box in the dialog and paste the number into the style sheet. Here is an example of the Inkscape color chooser:
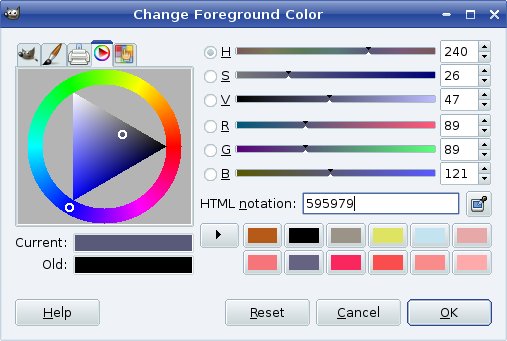
You spin the wheel around by dragging the while line in the circle until you get the color you want (red, green, blue...) and then click inside of the triangle to get the saturation and value that you want. Notice that the number 595979 is shown in the box labeled "RGBA". The "ff" in the box is the "alpha" channel, which specifies the transparency of the color. The style sheet does not understand that number, so we don't use it. Copy and paste only the other six numbers, 595979. A similar tool exists in the pixel editing tool called "The GIMP". The GIMP is another editor that runs on both Windows and Linux and is free. Here is a screen shot of the color chooser in The GIMP:
You can see that it is almost identical to the one in Inkscape. All you need to do is pick the color and then copy the number from the box labeled "HTML notation" and paste it into the style sheet. I made most of the colors in my style sheet black (#0) except I used the gray blue color in the following id's and classes:
I did a similar thing for the links on the page, making them light blue, "color: #1d51f8;" before being visited, and darker blue, "color: #170d6b;" after being visited. I am not completely happy with that choice, and I may revisit those colors in the future. You can also find a menu of web safe color choices on the css tutorial from the w3schools.com web site, here:
This site and all of its contents are copyright Brian S. Kimerer 2009 |


|
I am a software engineer by trade. For fun I build and play banjos and paint pictures. To see some of my work, click on the link that says "My Web Site" in the Links section of this page.
Favorite Links
Archives
August 2010
July 2010 June 2010 May 2010 March 2010 January 2010 November 2009 October 2009 September 2009 August 2009 July 2009 Archive Index Google Site Search
Credits
|